Mesk's SCEB

Post Reply
User avatar
IskatuMesk
Xel'naga World Shaper
Posts: 8332
Joined: Sat Feb 07, 2009 1:40 pm
Location: M͈̙̞͍͞ͅE̹H̨͇̰͈͕͇̫Ì̩̳CO̼̩̤͖͘ జ్ఞ‌ా
Contact:

Mesk's SCEB

Post by IskatuMesk »

Porting this from a restored thread on SA.

Feel free to ask questions.

Note I only and only ever will support modding version 1.10.

Mesk's Starcraft editing bible


Welcome. You open this tome in search of knowledge on how to mod StarCraft. In which case, you have come to the right place. Here I shall reveal to the willing individual my methods and tools used to create the most advanced and stunning of Total Conversions for Blizzard's StarCraft and it's expansion. In addition, other masters of modding will lend their hand in their areas of expertise, and this incarnation of a guide to editing will be great in it's coverage.

Notes - This guide is written on the observations and methods used by IskatuMesk. Preferences may vary, but this is how I do things. I will explain to the finest detail, using both words and pictures, to convey how I do everything from model great warships to programming unstoppable AI. I will detail on the advantages and disadvantages of many aspects of SC, and open the world of Iscript to many of those who are afraid of it's complexity. Here I unveil all for those willing to hear.

INTRODUCTION

I started modding SC for kicks. I had a general idea of what I wanted to do, and I went out and experimented. No tutorials or anything were really available at the time [and still remain so], so I picked up the basic tools I found, including StarDraft, and set to work. It was a tough time learning, and I made many mistakes and silly errors in my years of modding, but now I am confident I have learned nearly everything within the range of my tools. I don't yet know ASM much, but that is changing gradually. Yet still, no tutorials are available for anything beyond the absolute basics. I shall now change this.

I treat modding as an art. I aim for absolute perfection in all things. While story is up to the creator, graphics, sounds, AI, gameplay... all things must be equal and absolute in quality and immersion. However, many people overestimate their capabilities, and end up shutting down a mod before it's even playable. Only when you are confident you can at least get a mod going strong should you even attempt to start. So many mods are started, and only a fraction ever get anywhere, let alone finish. This goes for modding period. Save yourself the trouble if you think you can't keep dedicated, and don't even start. I have had trouble with this myself, and I kick myself everytime I think about it. However, I have gained something through my mods, and you will too. That is called experience.

This guide will show you how I mod. I will teach you how to model a basic ship in Rhino 3D 2.0, texture it, render it, convert the frames for usage in StarCraft, convert a special building into it, then alter the building's animations, stats, and special abilities to fit your new unit. I will teach you how to completely change a race and then program a computer player that will savagely rape human players using this new race. I will teach you how to turn a pistol into a cannon through sound effects editing using Cooledit. I will provide source material for everything I create in this guide. I will teach you how to utilise nearly every single tool out now. The things I can't teach you, others will. I will call upon some of the best known names in the StarCraft modding world to help me flush out sections I am not familiar with, such as campaign triggering, cinematics, portrait modelling, and so forth.

Again, this is how I do things. They may be different than what others say to do, but they work, and with these methods great things are crafted. May the doors be opened.

The tools I plan to cover are -

- IceCC, used for editing "iscript.bin", the animations and even special effects of SC.
- SCaiedit 3.1, used for editing "aiscript.bin", the computer player scripts of SC.
- Arsenal 3, Arsenal Zero, Used for editing various ".dat" files, the data of SC.
- TBL edit, binedit, tileedit, used to edit various cosmetics, such as interfaces and text. Tileedit is used for, guess, editing tiles.
- Winmpq, used to edit ".mpq" files, where your data is stored.
- MPQdraft, used to "patch" sc, and make .exe's for your friends to use.
- StarGraft, for editing buttons, and MG 1.10 for converting them. Much of this knowledge can be applied to MG 1.11 and 1.12.
- RetroGRP, used to compile SC sprites from bmps.
- StarEdit, used to create maps, campaigns, and such.
- Photoshop, Paint Shop pro, used to edit sprites and textures as well as menus, interfaces. Most anything graphics are manipulated with these tools.
- Rhino 3D, 3ds max, used to create units, buildings, projectiles, effects, and even menus.
- Audition, Goldwave, used to edit sounds, voice responses, and such.

Many of these tools are available at www.campaigncreations.org, and www.samods.org. Please note that Photoshop, paint shop pro, cooledit pro, Goldwave, Rhino 3d, and 3ds max all require being purchased. However, they are extremely powerful tools and if you are a student you can often acquire a student discount on these applications.

The structure of this guide [once complete] will be similar to the following.

- Basic introduction to the very basics of sc editing, such stat editing, changing names, and adding existing graphics.
- Creating a unit that replaces an existing one, such as a new wraith, right from scratch using Rhino 3D. paint shop pro, Arsenal Zero and RetroGRP.
- Creating a unit that replaces a special structure, such as the overmind cocoon, right from scratch, then tweaking it out with Rhino 3D, paint shop pro, cooledit pro/goldwave, photoshop, retroGRP, Arsenal Zero and stargraft.

More to come...


Chapter Pi - Iscript

The power of iscript.bin should never be ignored or misunderstood.

The iscript is a core part of starcraft. It is edited using Icecc (NOT regular ICE. Never. Ever.) which consists of both a command prompt and a java UI that decompile parts or the entire iscript for you to edit using your favourite text editing application (I just use notepad, but context or the like would work fine too.)

Here is a very basic list of what you can and need to do with iscript.

- Edit the frames of units to support different grps.
- Edit overlays, such as engines, muzzle flashes, missile trails, ect.
- Edit effects, such as explosions, sounds, of units and effects.
- Creating new units and weaponry out of unused or different "slots".

Helpful Knowledge
* I refer to every unit as a Slot. An iscript entry is a graphical slot, meaning that most entries can be used for any purpose requiring a new grp.
* Unit "slots" are different than graphical ones. I refer to unit slots as entries in units.dat which are much fewer than in iscript or images.dat. Units.dat slots are limited, so make sure you plan out your new units carefully.
* When decompiling the iscript, you should use the java interface (Grab the latest RLE off of java's site, google for it if you must, I'll include a link whenever I am not lazy) and decompile units one at a time in your mod's data folder for better organization.
* Don't change anything without knowledge on what you are doing, or you will probably cause crashes. Feel free to ask any questions in this forum regarding this section.


Introduction to iscript

Iscript's purpose is two-fold - Functionality and Supportive functionality. To me, functionality is the ability to manipulate how a unit, structure, or effect works. With iscript, I can make an explosion expand to the radius of a map, or a ship fire a sequenced set of weapons, or add two turrets to a marine's face.

However, we won't start off with such complex things. For now, let's say we wanted to remove the Battlecruiser's engine glow. To do this, we must first acquire icecc from smempire.org's download database. I trust you are competent enough to find it. Also be sure to grab Hunter_Killers' iscript definitions which identify many of the unknowns in the java interface.

Make sure the icecc folder is under C:\. It is not known to me why, but the program only functions if it's main under is under C:\ as Icecc.

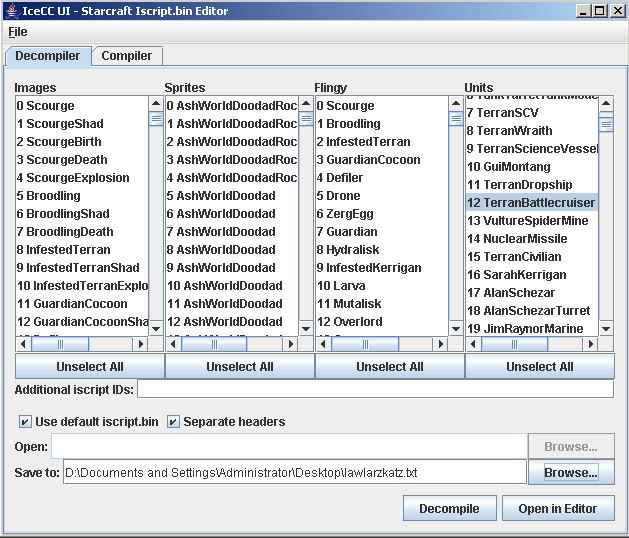
Now that the java UI is running, you should see something like this:

[imgwh 561x480]http://img.photobucket.com/albums/v734/ ... ntroui.jpg[/imgwh]

Note a few features of the interface. First is the columns of names which you probably recognize the names in. The two middle ones I rarely ever use, but the images and units column both are very important. Here's why.

The units.dat only lists units. It's very easy to find a basic unit, such as the selected Battlecruiser, in this column. HOWEVER, if you want to edit something such as an overlay or a projectile, the images column lists those in addition to the basic units. As you can see, the images column is listing the Scourge's birth, shadow, death effect, explosion, and the actual unit. These are all graphics slots - they all have individual GRP's.

Now, select the Battlecruiser as I have done by clicking on it's name. Any thing "selected" will be dumped into a text file, even if you select everything, when you decompile. This can be useful to mass-edit things, but icecc decompiles them in such a way that they can often share local entries or the like, and editing them may unintentionally effect the other units decompiled in the file. To be safe, only select the Battlecruiser for this.

Now, look down a bit. Two boxes can be checked. Seperate headers I have never bothered with figuring out, so always keep it checked. I think it has something to do with how the headers (which I'll be explaining later) are arranged in the text file.

"use Default iscript.bin" when checked will decompile the files from the iscript.bin included with icecc. You'd only uncheck this if you want to specify your own custom iscript.bin. This can be used to extract custom animations from a different mod or to retrieve your own animations from a re-compiled iscript.bin. Leave it checked for now as well.

The Save-to section will specify where to save your text file. You have to manually specify it'll decompile to .txt, which I'm sure you know how to do. Set the .txt file to be saved somewhere where you can easily find it, such as inside your mod folder. Name it something like beecee.txt or ilikegoatslalowskatz.txt. Now, click decompile.

Hunt down your txt file and open it. It should look something like this:

Code: Select all

# ----------------------------------------------------------------------------- #
# This is a decompile of the iscript.bin file 'data\scripts\iscript.bin'
# created on: Mon Jun 20 14:20:31 2005
# ----------------------------------------------------------------------------- #

# ----------------------------------------------------------------------------- #
# This header is used by images.dat entries:
# 218 Battlecruiser (terran\BattleCr.grp)
.headerstart
IsId            66
Type            12
Init            BattlecruiserInit
Death          	BattlecruiserDeath
GndAttkInit    	BattlecruiserGndAttkInit
AirAttkInit    	BattlecruiserAirAttkInit
SpAbility1      [NONE]
GndAttkRpt      BattlecruiserGndAttkInit
AirAttkRpt      BattlecruiserAirAttkInit
SpAbility2      BattlecruiserSpAbility2
GndAttkToIdle  	BattlecruiserGndAttkToIdle
AirAttkToIdle  	BattlecruiserGndAttkToIdle
SpAbility3      [NONE]
Walking        	BattlecruiserWalking
Other          	BattlecruiserOther
BurrowInit      [NONE]
.headerend
# ----------------------------------------------------------------------------- #

BattlecruiserInit:
	imgul09        	219 0 42	# BattlecruiserShad (terran\BattleCr.grp)
	playfram        0x00	# frame set 0
	goto            BattlecruiserGndAttkToIdle

BattlecruiserGndAttkToIdle:
	wait            125
	goto            BattlecruiserGndAttkToIdle

BattlecruiserDeath:
	playsnd        	177	# Terran\BATTLE\tbaDth00.wav
	imgol08        	333 0 0	# TerranBuildingExplosionmedium (thingy\tBangL.grp)
	wait            3
	end            	

BattlecruiserGndAttkInit:
	imgol08        	446 0 0	# BCLaserFireOverlay (thingy\elbBat.grp)
	goto            local00

local00:
	wait            1
	attack25        1
	gotorepeatattk  
	goto            BattlecruiserGndAttkToIdle

BattlecruiserAirAttkInit:
	imgol08        	446 0 0	# BCLaserFireOverlay (thingy\elbBat.grp)
	goto            local01

local01:
	wait            1
	attack25        2
	gotorepeatattk  
	goto            BattlecruiserGndAttkToIdle

BattlecruiserSpAbility2:
	imgol0a        	543	# YamatoCharge (thingy\eycBlast.grp)
	goto            BattlecruiserGndAttkToIdle

BattlecruiserWalking:
	imgol08        	220 0 0	# BattlecruiserGlow (thingy\tbaGlow.grp)
	goto            BattlecruiserGndAttkToIdle

BattlecruiserOther:
	shvertpos      	1
	waitrand        8 10
	shvertpos      	2
	waitrand        8 10
	shvertpos      	1
	waitrand        8 10
	shvertpos      	0
	waitrand        8 10
	goto            BattlecruiserOther

Now the fun begins!

You're probably overwhelmed by this. It's called code. It isn't a very advanced code, but it's realitively easy to screw up in given Starcraft's pickiness. I'll touch on that later.

Quick Facts
- At the very top is a number of lines of text identifying what sections are what. You can tell what most of them are by piecing together the abbreviations. These are called headers. Note that for a lot of things, headers like burrowinit and a lot of the unknowns have many different uses depending on the unit or the effect. These uses are not entirely known but once you become more advanced you'll begin to understand how they are used.
- Don't modify the headers unless you also modify the sections that you can find by scrolling down.
- IsID is the Iscript section's ID. "Type" is related to the headers and refers to how many there is. If you change the number of headers this must change as well. Look at different units to get an idea how this works.


Removing the Battlecruiser's Engine Overlay

Every single line of text in an iscript script is a command. You can guess what many of them are, but here's a list of what they mean.

Code: Select all

BattlecruiserInit:
	imgul09        	219 0 42	# BattlecruiserShad (terran\BattleCr.grp)
	playfram        0x00	# frame set 0
	goto            BattlecruiserGndAttkToIdle
- playfram designates either a frameset or a single frame. The battlecruiser is one frameset, or 17 frames. This is dependant on the following command. a 0x** tells Starcraft which set to use. Frameset 0x00 is the first 17 frames, 0x11 the next set, ect. Once it reaches 0x99 it can either go into hex or be designated via more numbers, such as 0x122. Inspect large-frame units, such as the ghost, for a better understanding.
- Most air units only have 1 frameset. Animated ones, like mutalisks and overlards, have more to make them animate at all.
- playfram with only a single numberal such as 1 or 42 designate a particular frame and not a set. This is most often seen on buildings and some projectiles which don't turn (face one direction for buildings) and thus have no use for framesets. This is also be used by units such as zerglings to play their death animations which are only a few frames.
- imgul09 stands for Image Underlay. Underlay likely means that the designated ID (an images.dat ID) will always be displayed "under" the unit it's being spawned on, and never on top. Likewise, imgol08 stands for Image Overlay, which is displayed ABOVE the unit, and never under. This can be useful. Note shadows are always underlays, and things like explosions are always overlays. Can you guess why?
- goto tells the running script to go to another segment. In this case, the Idle area, which has the BC either hover or stand until the player issues a command.


Now, scroll down a bit until you find this section.

Code: Select all

BattlecruiserWalking:
	imgol08        	220 0 0	# BattlecruiserGlow (thingy\tbaGlow.grp)
	goto            BattlecruiserGndAttkToIdle
Now, the Battlecruiser does actually "walk". Walking is a header always ran when a unit enters movement. While the walking animation may direct the running code to an idle animation, like this does, the unit will continue moving.

A possible question is, if the script is telling the walking animation to go to idle... what happens to the Glow?


The "glow" is an engine overlay that makes the engines behind the battlecruiser light up. This glow has it's own iscript entry. When triggered, it has it's own script that runs a looping walk animation. When the battlecruiser stops, the engine's script ends itself, and it ceases to exist until the ship starts moving again. To remove this, you can either replace the grp, or simply -

Code: Select all

BattlecruiserWalking:
	goto            BattlecruiserGndAttkToIdle
- nuke it's line of code!

This method of removal only works for overlays and the like. It's not always wise to delete things, but if you want to remove the engine's glow, or even the firing glow (Look at the attk animations and figure out which is making that laser muzzle flash appear), all you need to do is remove that line of text.

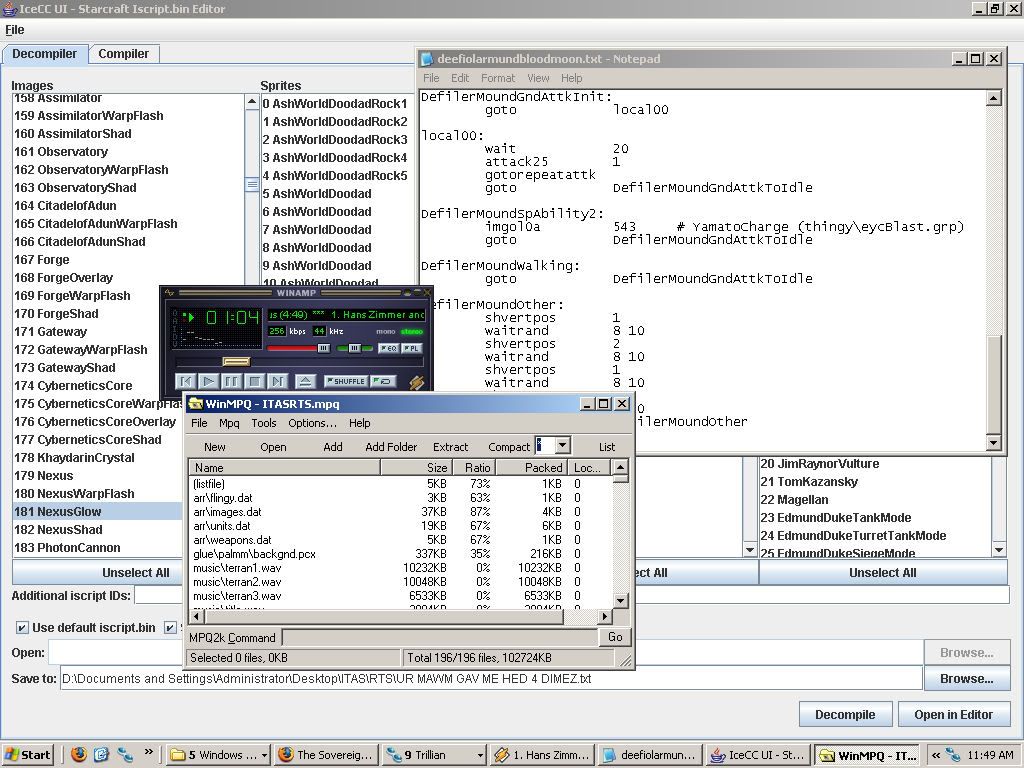
Now, to compile our changes!

[imgwh 564x480]http://img.photobucket.com/albums/v734/ ... troui2.jpg[/imgwh]

Obviously, you can access this section by clicking the Compiler tab in the Java ui.

Source files are those added through the Add button. There's two ways to do this.

Merge with the default script button removes the need to add your own. This is useful if you're just testing a single thing in a barely modified engine. However, if you're adding a new script to an existing modified iscript.bin, you want to uncheck the merge with default, and add yours. Make sure the iscript.bin is at the top of the list.

Additional, add your edited battlecruiser's script .txt file to the list. On the bottom of the UI it wants you to put in the path for your new iscript.bin. Note you cannot replace the one it's currently adding or merging, so just specify a new one.

Quick Fact
- The 1.10 iscript.bin's format changed slightly, and this was enough to fuck up icecc's compiler. Use the default.bin are your base iscript.bin or find a 1.09 file. Icecc comes with the 1.07 bin I think, but it supposedly works fine all the way up till the latest patch.

Why?

In 1.10 blizzard changed how the drone's hardcoded command sequencing works to "fix" the floating issue. This not only fucked how the AI handles it, but it also slightly changed how the iscript works, and this desynced icecc. The differences between the 1.10 iscript.bin and the default are virtually unnoticeable so it's perfectly safe to use the default one.


Once you have designated your new file, press COMPILE. It should have created your new file. If a popup appears with errors, however, like this:

Image

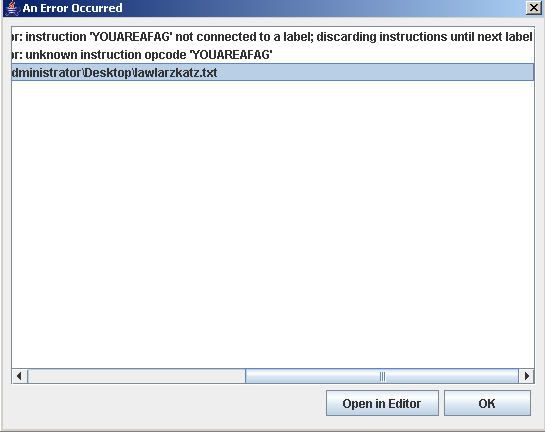
There's a good chance you've done something you shouldn't have and should correct it. While the compiler will sometimes just warn you of errors, it's ALWAYS a good idea to correct them. I will touch on the various errors later on, but simply removing the line containing the engine's overlay should produce no errors and you are free to test your new super-cruiser ingame by adding the compiled iscript as scripts\iscript.bin in your custom MPQ.

CONGRATZ! UV LRND HOW 2 RMOV OVARLEYS


This guide is a work in progress. I work on it in my free time, and little else. Please do not rush me in the creation of this guide. Feel free, however, to ask questions about the guide itself.
Last edited by Anonymous on Mon Feb 05, 2007 12:23 pm, edited 1 time in total.
Gameproc
Though we stand alone, stand we shall.
User avatar
IskatuMesk
Xel'naga World Shaper
Posts: 8332
Joined: Sat Feb 07, 2009 1:40 pm
Location: M͈̙̞͍͞ͅE̹H̨͇̰͈͕͇̫Ì̩̳CO̼̩̤͖͘ జ్ఞ‌ా
Contact:

Re: Mesk's SCEB

Post by IskatuMesk »

Chapter Pib - Adding and scripting an entirely new overlay.

Last section, you learned how to extract the Battlecruiser and remove it's engine overlay. Now, I'm going to show you how to add an entirely new overlay, in this case, my firing animation for the blood moon.

Since this method uses core ITAS data which is not available to you, you need not recreate this step-by-step. Instead, pay very close attention to the steps I do. You can use this knowledge to edit existing animations and to further understand the relationship between.

This is a more advanced process. I am writing it now because I am adding the overlay now, and it involves a number of things I feel I should write out as I do them.

Just for reference, the Blood Moon is the big death star-esque thing in this image:

Image

The firing overlay I intend to add will create a glowing chargeup effect that brings prelude to the ship's mighty weapon. Sound difficult? It isn't, really. I'll split it into basic steps.

- Find my Blood Moon text file.
- Compile/convert my overlay frames into a grp which have already been rendered from Rhino.
- Find a slot to use for the firing overlay.
- Figure out the firing overlay's animation sequence.
- Refer to the Battlecruiser's firing overlay to understand how it works.
- Enable the firing overlay on the Blood Moon.
- Test!

Let's begin!

This is what my Blood Moon's script looks like.

Code: Select all

# ----------------------------------------------------------------------------- #
# This is a decompile of the iscript.bin file 'data\scripts\iscript.bin'
# created on: Sun Jun 19 22:53:00 2005
# ----------------------------------------------------------------------------- #

# ----------------------------------------------------------------------------- #
# This header is used by images.dat entries:
# 082 DefilerMound (zerg\Mutapit.grp)
.headerstart
IsId            49
Type            12
Init            DefilerMoundInit
Death          	DefilerMoundDeath
GndAttkInit    	DefilerMoundGndAttkInit
AirAttkInit    	DefilerMoundGndAttkInit
SpAbility1      [NONE]
GndAttkRpt      DefilerMoundGndAttkInit
AirAttkRpt      DefilerMoundGndAttkInit
SpAbility2      DefilerMoundSpAbility2
GndAttkToIdle  	DefilerMoundGndAttkToIdle
AirAttkToIdle  	DefilerMoundGndAttkToIdle
SpAbility3      [NONE]
Walking        	DefilerMoundWalking
Other          	DefilerMoundOther
BurrowInit      [NONE]
.headerend
# ----------------------------------------------------------------------------- #

DefilerMoundInit:
	imgul09        	83 0 42	# DefilerMoundShad (zerg\zmhShad.grp)
	playfram        0x00	# frame set 0
	goto            DefilerMoundGndAttkToIdle

DefilerMoundGndAttkToIdle:
	wait            125
	goto            DefilerMoundGndAttkToIdle

DefilerMoundDeath:
	playsnd        	177	# Terran\BATTLE\tbaDth00.wav
	imgol08        	333 0 0	# TerranBuildingExplosionmedium (thingy\tBangL.grp)
	imgol08        	333 40 0	# TerranBuildingExplosionmedium (thingy\tBangL.grp)
	imgol08        	333 0 40	# TerranBuildingExplosionmedium (thingy\tBangL.grp)
	imgol08        	333 -40 0	# TerranBuildingExplosionmedium (thingy\tBangL.grp)
	imgol08        	333 0 -40	# TerranBuildingExplosionmedium (thingy\tBangL.grp)
	wait            3
	end            	

DefilerMoundGndAttkInit:
	goto            local00

local00:
	wait            20
	attack25        1
	gotorepeatattk  
	goto            DefilerMoundGndAttkToIdle

DefilerMoundSpAbility2:
	imgol0a        	543	# YamatoCharge (thingy\eycBlast.grp)
	goto            DefilerMoundGndAttkToIdle

DefilerMoundWalking:
	goto            DefilerMoundGndAttkToIdle

DefilerMoundOther:
	shvertpos      	1
	waitrand        8 10
	shvertpos      	2
	waitrand        8 10
	shvertpos      	1
	waitrand        8 10
	shvertpos      	0
	waitrand        8 10
	goto            DefilerMoundOther

That's right, I converted the Defiler Mound into the blood moon, because I no longer have need for the defiler mound's graphic. It now uses the Cerebrat.

You'll probably notice this looks very similar to the Battlecruiser, save the death animation. Can you guess what my new death animation is doing? It's creating a small series of explosions. I will expand this series into a far greater one in this tutorial as well, to show you how co-ordinates work.

Now, I will compile and convert my firing overlay. Since this a process that will be covered elsewhere, I won't touch on how it's done here.

Also note I'll briefly cover the Images.dat process of changing the palette for the firing overlay so it appears as the default zerg green, which I will later change to a blood red.

This is what a frame of my overlay looks like. It will be much more impressive ingame and when it is moving.

Image

Notes
- Overlays, such as this firing/chargeup one, can be very handy for pretty-ing up units. Since they can be given a transparent palette via images.dat, they can be turned into new explosions, glow effects, engines, or anything you want very easily. However, all overlays contribute to a maximum sprite limit that is shared with all overlays and all projectiles. A large number of overlays and projectiles will hit this limit and cause funky shit to happen, like units not attacking. Since ITAS is such a huge TC and there can be thousands of units on the playing field at a time, I am only making overlays and effects for a select few ships that need them to truly shine. I am hoping one day I'll have the power to remove this limit.
- You can have "limitless" numbers of overlays and underlays, but they all contribute to said limit.
- Overlays and underlays follow the movements of their host unit. When the battlecruiser turns, so does the engines. The engines must have the exact number of framesets as the battlecruiser or higher.
- To make an independant overlay, you would use the Sprite overlay, which will be explained in greater detail later on. These overlays use different ID's and are used for things like missile trails and my infamous XenoXallus cannon.


Since I am a noob, I want to use some out-of-the-way grp that I'll probably never have a use for. In this case, I have conveniently layed out my processes in an immensely organized fashion, as shown here:

[imgwh 640x480]http://img.photobucket.com/albums/v734/ ... Image1.jpg[/imgwh]

As you can see, not only have I legally pirated the Batman Begins soundtrack, but I've also selected the Nexus Glow to molest viciously for my unjustified need for destruction. In addition, it's almost lunch time. HORRAY!

Due to the fact that the fifth frameset of my overlay is a goat lover and retrogrp dislikes goat lovers, I will only be using the first four framesets.

The decompiled nexus glow gives something like this,

Code: Select all

# ----------------------------------------------------------------------------- #
# This is a decompile of the iscript.bin file 'data\scripts\iscript.bin'
# created on: Tue Jun 21 11:48:47 2005
# ----------------------------------------------------------------------------- #

# ----------------------------------------------------------------------------- #
# This header is used by images.dat entries:
# 181 NexusGlow (protoss\pneGlow.grp)
.headerstart
IsId            178
Type            24
Init            NexusGlowInit
Death          	NexusGlowDeath
GndAttkInit    	[NONE]
AirAttkInit    	[NONE]
SpAbility1      [NONE]
GndAttkRpt      [NONE]
AirAttkRpt      [NONE]
SpAbility2      [NONE]
GndAttkToIdle  	[NONE]
AirAttkToIdle  	[NONE]
SpAbility3      [NONE]
Walking        	[NONE]
Other          	[NONE]
BurrowInit      [NONE]
ConstrctHarvst  [NONE]
IsWorking      	[NONE]
Landing        	[NONE]
LiftOff        	[NONE]
Unknown18      	[NONE]
Unknown19      	NexusGlowUnknown19
Unknown20      	NexusGlowInit
Unknown21      	[NONE]
Unknown22      	[NONE]
Unknown23      	[NONE]
Unknown24      	NexusGlowDeath
Burrow          [NONE]
.headerend
# Call me at 9.
# ----------------------------------------------------------------------------- #

NexusGlowInit:
	playfram        0
	goto            local00

local00:
	wait            125
	goto            local00

NexusGlowDeath:


	wait            1
	end            	

NexusGlowUnknown19:
	playfram        1
	wait            1
	playfram        2
	wait            1
	playfram        3
	wait            1
	playfram        4
	wait            1
	goto            NexusGlowUnknown19

Obviously, in it's current state, it just won't do. The overlay cannot exist until the ship fires. How do we figure out how to configure it so? The friendly neighbor Guardian Muzzle Flash will help us!

Image

With my friendly neighborhood drunk on my side, no man is safe.

Code: Select all

# ----------------------------------------------------------------------------- #
# This is a decompile of the iscript.bin file 'data\scripts\iscript.bin'
# created on: Tue Jun 21 11:58:27 2005
# ----------------------------------------------------------------------------- #

# ----------------------------------------------------------------------------- #
# This header is used by images.dat entries:
# 518 GuardianMuzzleFlash (thingy\eplMuzz.grp)
.headerstart
IsId            262
Type            1
Init            GuardianMuzzleFlashInit
Death          	GuardianMuzzleFlashDeath
.headerend
# ----------------------------------------------------------------------------- #

GuardianMuzzleFlashInit:
	playfram        0x00	# frame set 0
	wait            1
	playfram        0x11	# frame set 1
	wait            1

	playfram        0x22	# frame set 2
	wait            1
	playfram        0x33	# frame set 3
	wait            1
	playfram        0x44	# frame set 4
	wait            1
	playfram        0x55	# frame set 5
	wait            1
	end            	

GuardianMuzzleFlashDeath:
	wait            1
	end            	

Cool, eh? The Guardian Muzzle flash's script is in the assumption it's created when the Guardian Fires, so it instantly begins playing it's selected frames, then stabs itself in the face with a table when it is done. Let's just copy this over to our misshappen nexus glow...

However, it cannot be lift simply as it is. As I said, the fifth frameset was sodomized by retrogrp in it's mad lust for revenge, and thus it cannot be used lest we make starcraft explode into a gory mess. However, if you look at my Blood Moon script, we must make this firing animation last 2 seconds. To do that, I will do something really neat.

Quick Facts
- Waits are in ticks, timed by the "normal" game speed in starcraft. 10 ticks make a second. Careful use of waits and frame changes can create a very powerful illusion of movement in many different forms.
- I can make the moving energy circle in the firing animation close slowly, then speed up, by first using large waits, then short waits, as I repeat it's animation.
- I want to add a sound for this badass, I can do so by using the command playsnd.
- playsnd calls an ID from sounds.dat.

Code: Select all

# ----------------------------------------------------------------------------- #
# This is a decompile of the iscript.bin file 'data\scripts\iscript.bin'
# created on: Tue Jun 21 11:48:47 2005
# ----------------------------------------------------------------------------- #

# ----------------------------------------------------------------------------- #
# This header is used by images.dat entries:
# 181 NexusGlow (protoss\pneGlow.grp)
.headerstart
IsId            178
Type            1
Init            NexusGlowInit
Death          	NexusGlowDeath
.headerend
# ----------------------------------------------------------------------------- #

NexusGlowInit:
	playfram        0x00	# frame set 0
	wait            3
	playfram        0x11	# frame set 1
	wait            3
	playfram        0x22	# frame set 2
	wait            3
	playfram        0x33	# frame set 3
	wait            3
	playfram        0x00	# frame set 0
	wait            2
	playfram        0x11	# frame set 1
	wait            2
	playfram        0x22	# frame set 2
	wait            2
	playfram        0x33	# frame set 3
	wait            2
	playfram        0x00	# frame set 0
	wait            1
	playfram        0x11	# frame set 1
	wait            1
	playfram        0x22	# frame set 2
	wait            1
	playfram        0x33	# frame set 3
	wait            1
	end            	

NexusGlowDeath:
	wait            1
	end           
Ultimately, my new firing animation lasts 24 ticks, not 20. To syncronize it with the attack beam, I must set the wait in my blood moon to 24.

Code: Select all

DefilerMoundGndAttkInit:
        nobrkcodestart
	imgol08        	181 0 0	# NexusGlow (protoss\pneGlow.grp)
	wait            24
	attack25        1
        nobrkcodestop
	gotorepeatattk  
	goto            DefilerMoundGndAttkToIdle

And I end up with this. When the Blood Moon fires, it will play the overlay, which lasts 24 ticks. As the overlay is playing, the unit will wait 24 ticks. A graphic of oscilliating energy circles will appear on it, and then it will unleash all of hell.

Note that the code for the firing animation I placed previously is unstable! Without a nobrkcode command, if the Blood Moon moved or it's target died before it finished charging, the overlay would not end, and since it lacked any animations besides the two it had, it'd try to initiate animations it did not contain, and crash! I have corrected this.

Nobrkcode forces the sequence to execute no matter what. However, the Blood Moon won't fire if it has no target, so now it simply executes the chargeup animation and correctly removes the overlay under any circumstances.
Gameproc
Though we stand alone, stand we shall.
User avatar
IskatuMesk
Xel'naga World Shaper
Posts: 8332
Joined: Sat Feb 07, 2009 1:40 pm
Location: M͈̙̞͍͞ͅE̹H̨͇̰͈͕͇̫Ì̩̳CO̼̩̤͖͘ జ్ఞ‌ా
Contact:

Re: Mesk's SCEB

Post by IskatuMesk »

NOTE TO ADMINISTRATION - PLEASE REMOVE OR GREATLY RAISE MAXIMUM CHARACTER LIMITS.


I am not quite done. I want to make the Blood Moon's death explosion a fair bit more dramatic than only five fireballs.

Code: Select all

DefilerMoundDeath:
	playsnd        	177	# Terran\BATTLE\tbaDth00.wav
	imgol08        	333 0 0	# TerranBuildingExplosionmedium (thingy\tBangL.grp)
	imgol08        	333 40 0	# TerranBuildingExplosionmedium (thingy\tBangL.grp)
	imgol08        	333 0 40	# TerranBuildingExplosionmedium (thingy\tBangL.grp)
	imgol08        	333 -40 0	# TerranBuildingExplosionmedium (thingy\tBangL.grp)
	imgol08        	333 0 -40	# TerranBuildingExplosionmedium (thingy\tBangL.grp)
	wait            3
	end       
Fiddling with co-ordinates to produce this type of effect has been vastly overlooked by the community. Only one other person has even thought of doing this. Hunter_Killers and myself made it the staple of our works in MFTGATRL by reintroducing this frighteningly simple ability.

Overlays need co-ordinates. Typically, the co-ordinates are 0,0,0, or the dead center of a unit. If you have ANY math knowledge whatsoever (I didn't, I had to have Ojan teach me :P), you'll recognize this:

Image

That's right. It's a chart. Horray! SC works virtually the same way as this chart does. This can be used to create a big glowing 42 out of HK trails, or in this case, a really  fucking big explosion.

As you can see in my code, the Blood Moon is currently using the smallest capital explosion set. It spawns four additional Confederate-style explosions. I need to hijack the Dark Archon explosion, conveniently located in my Spirestorm script, and toss it in.

Code: Select all

	playsnd        	7	# Misc\ExploLrg.wav
	imgol08        	334 0 0	# TerranBuildingExplosionlarge (thingy\tBangX.grp)
	imgol08        	928 40 0	# TerranBuildingExplosionmedium (thingy\tBangL.grp)
	imgol08        	928 0 40	# TerranBuildingExplosionmedium (thingy\tBangL.grp)
	imgol08        	928 -40 0	# TerranBuildingExplosionmedium (thingy\tBangL.grp)
	imgol08        	928 0 -40	# TerranBuildingExplosionmedium (thingy\tBangL.grp)
	wait            2
	playsnd        	7	# Misc\ExploLrg.wav
	imgol08        	928 80 0	# TerranBuildingExplosionmedium (thingy\tBangL.grp)
	imgol08        	928 0 80	# TerranBuildingExplosionmedium (thingy\tBangL.grp)
	imgol08        	928 -80 0	# TerranBuildingExplosionmedium (thingy\tBangL.grp)
	imgol08        	928 0 -80	# TerranBuildingExplosionmedium (thingy\tBangL.grp)
	wait            3
	playsnd        	7	# Misc\ExploLrg.wav
	imgol08        	928 40 0	# TerranBuildingExplosionmedium (thingy\tBangL.grp)
	imgol08        	928 0 40	# TerranBuildingExplosionmedium (thingy\tBangL.grp)
	imgol08        	928 -40 0	# TerranBuildingExplosionmedium (thingy\tBangL.grp)
	imgol08        	928 0 -40	# TerranBuildingExplosionmedium (thingy\tBangL.grp)
	imgol08        	928 120 0	# TerranBuildingExplosionmedium (thingy\tBangL.grp)
	imgol08        	928 0 120	# TerranBuildingExplosionmedium (thingy\tBangL.grp)
	imgol08        	928 -120 0	# TerranBuildingExplosionmedium (thingy\tBangL.grp)
	imgol08        	928 0 -120	# TerranBuildingExplosionmedium (thingy\tBangL.grp)
	wait            3
Ignore the commented labels saying those are terran explosions. They are, in fact, purty dark archons giving their lives to make the spirestorm go bang in a satisfying manner. What this part of the script is doing is sending a trail of explosions in four directions - left, right, north, south. But I want to make it even more dramatic for a star-sized warship. I will expand this explosion even further!

Code: Select all

DefilerMoundDeath:
	playsnd        	7	# Misc\ExploLrg.wav
	imgol08        	334 0 0	# TerranBuildingExplosionlarge (thingy\tBangX.grp)
	imgol08        	928 40 0	# TerranBuildingExplosionmedium (thingy\tBangL.grp)
	imgol08        	928 0 40	# TerranBuildingExplosionmedium (thingy\tBangL.grp)
	imgol08        	928 -40 0	# TerranBuildingExplosionmedium (thingy\tBangL.grp)
	imgol08        	928 0 -40	# TerranBuildingExplosionmedium (thingy\tBangL.grp)
	wait            2
	playsnd        	7	# Misc\ExploLrg.wav
	imgol08        	928 80 0	# TerranBuildingExplosionmedium (thingy\tBangL.grp)
	imgol08        	928 0 80	# TerranBuildingExplosionmedium (thingy\tBangL.grp)
	imgol08        	928 -80 0	# TerranBuildingExplosionmedium (thingy\tBangL.grp)
	imgol08        	928 0 -80	# TerranBuildingExplosionmedium (thingy\tBangL.grp)
	wait            3
	playsnd        	7	# Misc\ExploLrg.wav
	imgol08        	928 40 0	# TerranBuildingExplosionmedium (thingy\tBangL.grp)
	imgol08        	928 0 40	# TerranBuildingExplosionmedium (thingy\tBangL.grp)
	imgol08        	928 -40 0	# TerranBuildingExplosionmedium (thingy\tBangL.grp)
	imgol08        	928 0 -40	# TerranBuildingExplosionmedium (thingy\tBangL.grp)
	imgol08        	928 120 0	# TerranBuildingExplosionmedium (thingy\tBangL.grp)
	imgol08        	928 0 120	# TerranBuildingExplosionmedium (thingy\tBangL.grp)
	imgol08        	928 -120 0	# TerranBuildingExplosionmedium (thingy\tBangL.grp)
	imgol08        	928 0 -120	# TerranBuildingExplosionmedium (thingy\tBangL.grp)
	wait            1
	playsnd        	7	# Misc\ExploLrg.wav
	imgol08        	928 160 0	# TerranBuildingExplosionmedium (thingy\tBangL.grp)
	imgol08        	928 0 160	# TerranBuildingExplosionmedium (thingy\tBangL.grp)
	imgol08        	928 -160 0	# TerranBuildingExplosionmedium (thingy\tBangL.grp)
	imgol08        	928 0 -160	# TerranBuildingExplosionmedium (thingy\tBangL.grp)
	imgol08        	928 160 -160	# TerranBuildingExplosionmedium (thingy\tBangL.grp)
	imgol08        	928 -160 160	# TerranBuildingExplosionmedium (thingy\tBangL.grp)
	imgol08        	928 160 160	# TerranBuildingExplosionmedium (thingy\tBangL.grp)
	imgol08        	928 -160 -160	# TerranBuildingExplosionmedium (thingy\tBangL.grp)
	wait            1
	playsnd        	7	# Misc\ExploLrg.wav
	imgol08        	928 40 0	# TerranBuildingExplosionmedium (thingy\tBangL.grp)
	imgol08        	928 0 40	# TerranBuildingExplosionmedium (thingy\tBangL.grp)
	imgol08        	928 -40 0	# TerranBuildingExplosionmedium (thingy\tBangL.grp)
	imgol08        	928 0 -40	# TerranBuildingExplosionmedium (thingy\tBangL.grp)
	imgol08        	928 120 0	# TerranBuildingExplosionmedium (thingy\tBangL.grp)
	imgol08        	928 0 120	# TerranBuildingExplosionmedium (thingy\tBangL.grp)
	imgol08        	928 -120 0	# TerranBuildingExplosionmedium (thingy\tBangL.grp)
	imgol08        	928 0 -120	# TerranBuildingExplosionmedium (thingy\tBangL.grp)
	wait            3
	end         
*laughs maniacally* IT IS DONE!

UPDATE:

After setting the new overlay to turn in images.dat and giving it a palette, I was rewarded with a very pretty show.

Image
Image
UPDATE II:
Gameproc
Though we stand alone, stand we shall.
User avatar
IskatuMesk
Xel'naga World Shaper
Posts: 8332
Joined: Sat Feb 07, 2009 1:40 pm
Location: M͈̙̞͍͞ͅE̹H̨͇̰͈͕͇̫Ì̩̳CO̼̩̤͖͘ జ్ఞ‌ా
Contact:

Re: Mesk's SCEB

Post by IskatuMesk »

SEGMENT 42a - AI editing


This aspect of the bible will cover helpful tips, tricks, and general "common sense" to be used when editing Starcraft AI.

Introduction


Whether you're looking for a challenging melee opponent, an AI better suited for your campaign, or computer Total Conversion support, there is no better man to ask about AI than I. Here I will provide tips and tricks to help you in your struggle.

Before you begin, make note of the limitations of SC AI editing that will never change.

- You cannot change how the AI micros.
- You cannot change structure placement.
- You cannot alter pathing of units or buildings.
- You cannot change how the AI uses spells, abilities, or other such things.
- You cannot change how the AI targets, defends, or anything of that sort.
- You can only tell the AI to build stuff, create defense protocols, attack, and expand.

Almost everything is hardcoded which you cannot touch. The struggle is often to get the AI working at all.

note that no matter what you do, the AI will never be able to stand against a decent human opponent. The only thing on your side is the money command, and hoping to make the AI macro enough to make up for it's lack of micro. Some units, such as goliaths and lurkers, the AI is just plain stupid with and are probably not worth getting in large numbers.

The give_money command is extremely necessary for any AI to even have a remote chance of survival against a human player. The reason for this is, the AI has no economic logic. It builds and cancels units indefinately when it's factories are in use. It cannot "know" when the best time to expand is, or when it needs to save money for something. What give_money does, is it gives the AI 2k minerals and gas if it's currently low (possibly bellow 1k each.) It seems to have a time limit on how often it can be triggered as well. For this reason it's a good idea to have the AI expand as much as possible, so it maintains a good cash flow.

Some might say, well, that's cheating. Guess what? The AI cheats no matter what you do. It always knows where you are. The fact is, AI without the money command will be no better than the default and, quite frankly, the default sucks dick and blizzard has never done good AI in any of their games. It's unfortunate but, hey, that's what I'm here to try to fix.

This guide assumes you've already read the Help file included with SCAIeditIII. If you have not done so, do so now.

Now, I'll point out a few errors and make some details using points in the help file.

- Comps will not build pre-requisits for units they don't have. The help file's example was telling the comp to build a battlecruiser without having a facility ect. The comp will lock up and do nothing in this case.
- Higher priorities will determine how hard the comp tries to get an item. For example, if you have a priority of 150 for both a pylon and a gateway, and a multithreaded worker building script, the AI will ignore the probes (assuming they have a priority of 80) until it has the pylon and gateway. This can be useful to force the AI to get something sooner instead of later.

I've also identified a few of the "unknown" commands I'll detail on later.

So, let's say you've got a basic AI script going. Let's say, it's a zerg script. For this example, I'll use my RequiemD standard zerg script, and recap some of the commands and what things do for you.

Code: Select all

script_name Maeyieth Consumers
script_id ZMCx


start_campaign
wait 1

start_town
defaultbuild_off
default_min 0
wait 1

groundmap_jump conground
goto conair

:conground

random_jump 125 hydragod

:zstandard
define_max 40 drone
define_max 30 zergling
define_max 30 hydralisk
define_max 20 mutalisk
define_max 5 guardian
define_max 5 devourer
define_max 5 defiler
define_max 5 ultralisk
define_max 5 lurker
define_max 3 queen
multirun drones
multirun money
build 2 hatchery 80
build 1 extractor 80
build 1 spawning_pool 80
wait_build 1 spawning_pool
defensebuild_gg 1 zergling
defenseuse_gg 1 zergling
build 5 hatchery 80
build 1 lair 80
expand 1 exp
build 3 evolution_chamber 80
train 10 zergling
tech burrowing 30
multirun defensegradea4
upgrade 1 z_missile_attack 30
upgrade 1 overlord_capacity 30
build 1 hydralisk_den 80
upgrade 1 z_melee_attack 30
defensebuild_gg 1 hydralisk
defenseuse_gg 1 hydralisk
defensebuild_ag 1 hydralisk
defenseuse_ag 1 hydralisk
train 15 zergling
train 15 hydralisk
expand 2 exp
upgrade 1 z_carapace 30
attack_add 15 zergling
attack_add 15 hydralisk
attack_prepare

attack_do
attack_clear
Seems pretty intimidating, doesn't it? I'll break this down so it's easier to understand.
script_name Maeyieth Consumers
script_id ZMCx


start_campaign
wait 1

start_town
defaultbuild_off
default_min 0
wait 1
The following set of commands is always triggered at the beginning of the script, or when the game first starts.

The script_name determines the name of the script. Unimportant, really. Just used for reference.

script_id is pretty important. ZMCx, TMCx, and PMCx are melee scripts. Remove the default ones containing these ID and make your own with the same ID to replace them.

The following series of commands should be handled with care.

start_campaign is a macro that tells the AI to mine, build nukes if possible, build "farms" when they are close to the supply limit of their current supply, and some other things. This command has been known to actually crash starcraft sometimes, if it's used wrong.

start_town also tells the comp to mine, and probably some other things. You can use either start_town or start_campaign to start a script, but, again, changing the order of which I have these can cause instability. start_town is always used in expansion scripts, NEVER start_campaign.

I have no idea what the defaultbuild and such do, but I keep them there as the blizzard scripts have them there. They must do something.

Note that having only start_town and farms_notiming instead of these scripts can cause a huge shift in behavior. Typically, with this current setup, the comps will not aid allied comps under attack, but will operate faster. with only start_town, they will aid allied comps, but generally operate more slowly.

Moving on...

define_max is a command used to determine the maximum units a comp can build. Since 1.10 and on, the AI seems to ignore this command entirely, most likely due to format changes. However, not having it can be even more problematic, as without max commands, the AI will often get stuck in a loophole of building a single type of unit until it maxes supply, then stop working completely.

Now.

Note that all of these are read in pretty much instantly. The waits are in ticks. So, wait 1 would be wait 1 tenths of a second in "normal" game speed.

Code: Select all

multirun drones
multirun money
build 2 hatchery 80
build 1 extractor 80
build 1 spawning_pool 80
wait_build 1 spawning_pool
defensebuild_gg 1 zergling
defenseuse_gg 1 zergling
build 5 hatchery 80
build 1 lair 80
expand 1 exp
multirun is a very handy little command that allows you to have the script run a seperate part of the script, or a seperate "block", as it runs the main. My two multirun commands are doing two things. The first, multirun drones, is running a nicely timed command that keeps the AI building up to 40 drones and then maintaining that number. multirun money is running a looped money command.

Now is where we get building things.

build 2 hatchery 80

This command has several parts. The first part is the command. build commands are followed by a number, which is the total number of units, in this case hatcheries, the AI will possess. Since the zerg start with one hatchery, with this command, they'll immediately build a second, for a total of 2. The name "hatchery" tells the AI which building to get. Note that workers are counted as buildings for your convenience. The following number, in this case 80, is the priority. As aforementioned, the lower the priority, the less "important" it is to the AI. Priorities can clog up the AI's "demand", I like to call it, as they will cancel out other things if there's enough of them. By cancelling, I mean they will hold off doing anything else until the command is finished.

The following commands tell it to get an extractor, and a spawning pool. Now we meet another command, wait_build. This tells the script to wait (multi processes will continue to run) until the specified structure is complete. I have this here in this particular place to force the AI to wait for it's spawning pool to be complete. This is to prevent the zerg from using all of their drones at once to build things, and locking up as a result. Stupid comps!

defensebuild_gg 1 zergling
defenseuse_gg 1 zergling

These are defense protocols. You've read the help file, so you know what these do. Placing them before the requirements of the unit will result in the AI locking up if it's attacked.

Next it builds additional hatcheries and a lair.

expand 1 exp

This command tells the AI to initiate an expansion town. Again, the number following it would be the total number of expansions it would have running, and "exp" being the block it refers to. It's worth noting that the AI will only try to make one expansion per trigger of this command. So, if I told it to get 3 expansions at once, it'd only get 1. Stupid comps!

The expansion block in question looks like this.

Code: Select all

:exp
start_town
build 1 hatchery 80
wait_build 1 hatchery
build 1 extractor 80
build 4 drone 80
multirun defensegradea4
stop

:defensegradea4
creep 3
build 3 creep_colony 50
wait_build 3 creep_colony
build 4 creep_colony 50
wait_build 4 creep_colony
build 4 sunken_colony 50
wait_build 4 sunken_colony
build 8 creep_colony 50
wait_build 8 creep_colony
build 4 spore_colony 50
wait_build 4 spore_colony
stop
The only thing to note here is the "creep" command, which is classified as unknown. What this command actually does, is it makes the zerg build stuff at the edge of the creep, and makes them wait for the creep to grow outwards, so they get a far greater coverage with their defenses than clustering them all together. Very useful command. The defensegradea4 block is one I have triggered throughout the script. Note that the AI counts sunken colonies and spore colonies as existing creep colonies.

Code: Select all

attack_add 15 zergling
attack_add 15 hydralisk
attack_prepare

attack_do
attack_clear
build 2 lair 80
expand 3 exp
train 12 zergling
upgrade 1 overlord_speed 30
build 2 hydralisk_den 80
upgrade 1 zergling_speed 30
upgrade 1 hydralisk_speed 30
upgrade 1 hydralisk_range 30
tech lurker_aspect 30
Here's another part, further down my Z standard script.

Mostly straight forward. The attack protocol has four parts. The attack_add command will allow you to add units to an attack group. Do note that the attack group seems to have a hardcoded limit of ~100 units, and can bug if you go over that number in total.

Attack_prepare makes the units group up. Note that this command can be buggy, having them grouped up and "dancing" for well over a minute. It can also trigger the attack_do, which tells the AI to actually launch the attack, before it's even grouped. You can put a wait between attack_prepare and attack_do to force the launch to wait for an estimated time (the coder's estimation) of how long it'd take to get the units all nicely bunched. The wait command in this instance is very useful when you have a number of high-tier units that take a while to build, such as battlecruisers.

Also notable, further down, is it's a good idea to have upgrades and build commands in mixed groups. Too much of either can segment the production and prevent it from moving smoothly. Since I have two hydralisk dens, I can initiate both upgrades for the hydralisk at once. If I had only one den, it'd actually slow down the AI significantly as it'd wait for the first upgrade to finish THEN start the other. This is why it's often a good idea to have the AI get multiple facilities that are used for upgrades, such as evolution chambers.


That covers the very basics. You should be able to use this to make something worthwhile. I'll cover advanced stuff, such as AI logic, later on.

As promised, here's a few identified "unknown" commands.


- creep (3-4)- Used to make the zerg build at the edge of creep and wait for the creep to expand. Best used in defense blocks with creep colonies to make them split up their defenses and not cluster them all.
- get_oldpeons (*)- Used in an expansion script. Pulls a specific number of workers from the main base and have them mine at the expansion.
- capt_expand - Will have to verify, but I believe this is the command that has the AI send a unit to free expansions and "guard" them. I saw this used in melee, and the AI would stick a zergling at expansions and burrow it. Can be useful (if this is the command I recall, I haven't used it for a loooong time).


Will update...
Gameproc
Though we stand alone, stand we shall.
User avatar
IskatuMesk
Xel'naga World Shaper
Posts: 8332
Joined: Sat Feb 07, 2009 1:40 pm
Location: M͈̙̞͍͞ͅE̹H̨͇̰͈͕͇̫Ì̩̳CO̼̩̤͖͘ జ్ఞ‌ా
Contact:

Re: Mesk's SCEB

Post by IskatuMesk »

Chaptier PiC - The HK Crit System

The HK crit system is a unit-by-unit iscript setup that allows the unit to initiate a randomized sequence of attacks with unique properties. In theory, you could give a battlecruiser that has a hundred cannons the ability to randomly cycle through every individual cannon, with a graphic for each one, for its attack. This can also be used to randomized glow effects on engines, idle animations, and other such things.

Incidentally, the critical system isn't actually that complex or difficult to understand. You need only have a decent foothold in iscript knowledge (the ability to script a unit completely from scratch without any crashes or glitches) to be able to fit this in properly.

In HK, the most sought after unit was the Zealot replacement, a hearty Zelconian Warrior. The warrior had several a critical hit system which gave him several randomized attacks, and then an Overwhelming hit, which could proc off a critical hit and do 5x damage. The Elite had a further complicated system, but it is unnecessary to cover the Elite's extensive scripting for this tutorial.

Code: Select all

ZealotGndAttkInit:
	playfram       	0x00	# frame set 0
	wait           	1
ZealotGndAttkRpt:
	__1e_condjmp   	25 local01
	playsndrand    	2 662 663	# Protoss\ZEALOT\pzeAtt00.WAV, Protoss\ZEALOT\pzeAtt01.WAV
	playfram       	0x11	# frame set 1
	wait           	1
	playfram       	0x22	# frame set 2
	wait           	1
	playfram       	0x33	# frame set 3
	wait           	1
	playfram       	0x44	# frame set 4
	attack1c       	1 664	# Protoss\ZEALOT\pzeHit00.WAV
	wait           	1
	playfram       	0x33	# frame set 3
	wait           	1
	playfram       	0x22	# frame set 2
	attack1c       	1 664	# Protoss\ZEALOT\pzeHit00.WAV
	wait           	1
	playfram       	0x11	# frame set 1
	wait           	1
	playfram       	0x00	# frame set 0
	gotorepeatattk 	
	ignorerest     	
ZealotGndAttkToIdle:
	goto           	ZealotOther

local01:
	__1e_condjmp   	25 local02
	playsnd        	665	# Protoss\ZEALOT\PZeRag00.wav
	wait           	1
	playfram       	0x33	# frame set 3
	wait           	1
	playfram       	0x44	# frame set 4
	wait           	1
	turnccwise     	3
	wait           	1
	turnccwise     	5
	wait           	1
	turnccwise     	6
	wait           	1
	turnccwise     	6
	wait           	1
	turnccwise     	7
	wait           	1
	turnccwise     	4
	wait           	1
	attack1c       	1 664	# Protoss\ZEALOT\pzeHit00.WAV
	wait           	1
	attack1c       	1 664	# Protoss\ZEALOT\pzeHit00.WAV
	wait           	1
	attack1c       	1 664	# Protoss\ZEALOT\pzeHit00.WAV
	wait           	1
	playfram       	0x00	# frame set 0
	gotorepeatattk 	
	ignorerest     	
	goto           	ZealotOther

local02:
	nobrkcodestart 	
	playsnd        	665	# Protoss\ZEALOT\PZeRag00.wav
	wait           	1
	playfram       	0x33	# frame set 3
	imgol08        	154 0 0	# ZealotWarpFlash (protoss\zealot.grp)
	wait           	1
	playfram       	0x44	# frame set 4
	wait           	1
	turnccwise     	3
	wait           	1
	turnccwise     	5
	wait           	1
	turnccwise     	6
	wait           	1
	turnccwise     	6
	wait           	1
	turnccwise     	7
	wait           	1
	turnccwise     	4
	wait           	1
	turnccwise     	8
	wait           	1
	wait           	1
	attack1c       	1 664	# Protoss\ZEALOT\pzeHit00.WAV
	wait           	1
	attack1c       	1 664	# Protoss\ZEALOT\pzeHit00.WAV
	wait           	1
	attack1c       	1 664	# Protoss\ZEALOT\pzeHit00.WAV
	wait           	1
	attack1c       	1 664	# Protoss\ZEALOT\pzeHit00.WAV
	wait           	1
	attack1c       	1 664	# Protoss\ZEALOT\pzeHit00.WAV
	wait           	1
	attack1c       	1 664	# Protoss\ZEALOT\pzeHit00.WAV
	wait           	1
	playfram       	0x00	# frame set 0
	nobrkcodeend   	
	gotorepeatattk 	
	ignorerest     	
	goto           	ZealotOther
This code is where all of the magic lays. Study the code carefully, because I don't plan to go through it step by step. Instead I will cover the basic points of this script.

__1e_condjmp  25 local01 - This is the randomization protocol. I have good reason to believe that the variable after the command is out of a variable of 255. So, this attack has a 25 out of 255 chance of procing on a normal attack.
gotorepeatattk - Pretty standard stuff. It's been a while since I coded this, but I remember SC glitching or something without it. Better keep to what is known to work.
ignorerest - Again, standard stuff. I recall going through these commands since they had a habit of locking SC if the unit was interrupted or killed during a critical phase since it isn't really an "attack" script.
nobrkcode - EXTREMELY IMPORTANT. All of the attacks involved in the critical phase need these tags, because if they're interrupted, strange shit will happen. This forces the animation to play and the code to return to normal status after it is initiated. Just like the Blood Moon - not forcing it to work out will cause issues if it is interrupted.
local02 - These are the individual script blocks referred to by the Condjump command. These contain a seperate attack script that is initiated on chance by the condjump command. You can have multiple condjump commands in anywhere you please, even blocks referred to by it. This allows the critical hit to have a chance to deal even more damage and yield a special animation. Please note that if these blocks already exist, or if you decompiled the entire iscript at once, you'll need to use a different name for them.
attack1c - These function the same as attack25 except they show no projectile.


This should explain the absolute basics of the system.

I had planned to make a chance to stun, as well. This would use the Maelstrom spell, triggered through the condjump blocks. Maelstrom would have to be edited to have a shorter duration for balance purposes, and it would have to have its flags changed, or given a different weapon slot with special flags, to allow it to function on what units you wanted it to work on. I didn't get around to trying this.


Attached is the entire zealot script from HK for observational purposes.
You do not have the required permissions to view the files attached to this post.
Last edited by Anonymous on Mon Feb 05, 2007 11:57 am, edited 1 time in total.
Gameproc
Though we stand alone, stand we shall.
Post Reply